Creating Chrome Browser Extension with Flutter UI Kit
Flutter Web for Extension Development
📅 2021.11.07 - 👤 Borbély Viktor
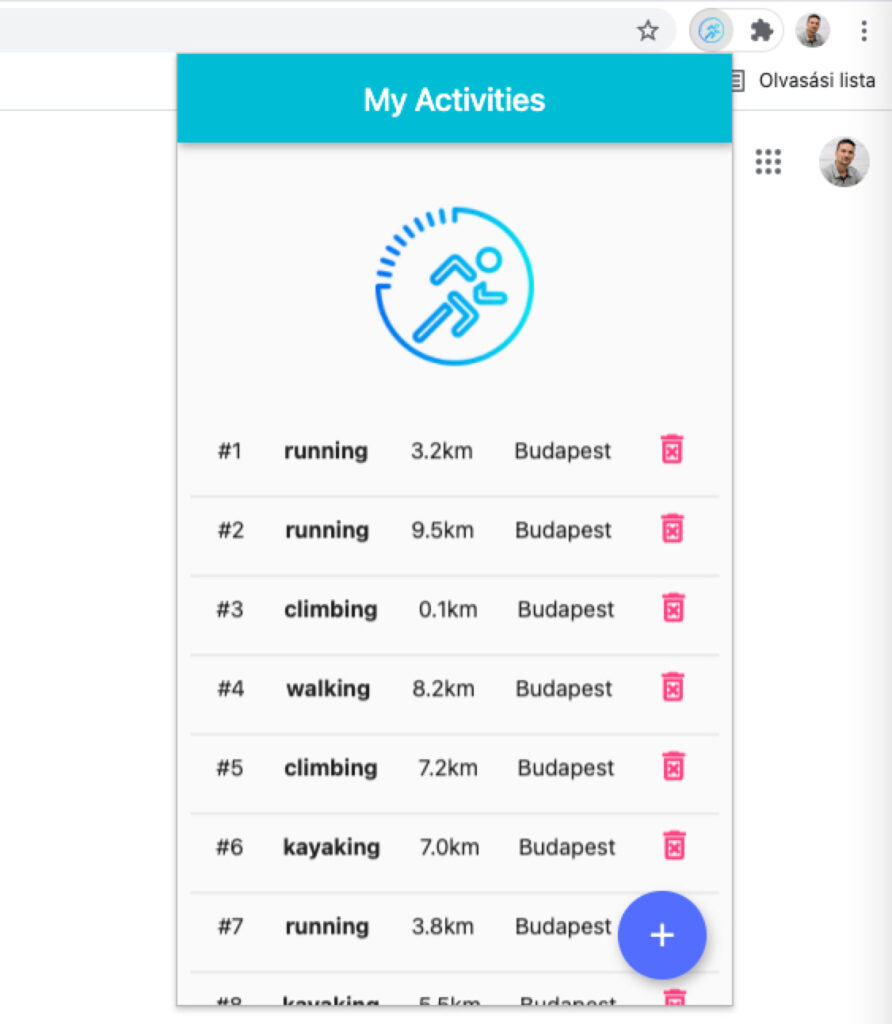 example My Activities extension in Chrome
A mobile app is not always needed for a task. Moreover, if someone works a lot in a browser, fiddling on a small surface for long hours is annoying. It is clearly visible that web browsers dominate over desktop applications. Online services are unimaginable without them. There is another circle that still belongs here, plug-in extensions.
What is a browser extension?
Browser extensions have been with us for a long time. Many of us use them as useful additions during our daily tasks. These are parts of browsers that enthusiastic developers or even serious companies have developed and made available. They have free and paid versions. They are capable of solving quite complex operations, extending the knowledge of the basic browser.
Since the companies developing browsers (Google, Apple, Microsoft, etc.) only provide the framework, anyone can write an extension. The framework is given, the standard is given, you just need an idea of what problem this useful tool could solve. Since it’s always at hand in the browser, you don’t have to leave the window for a function, thereby improving the user experience (UX).
What will we create?
In the video below, I show what can be created in a few hours with Flutter Web. It doesn’t require FrontEnd knowledge and writing JavaScript code.
Chrome browser extension in action
How to write a browser extension
This post helped me in writing the article.
If you want to try it quickly, jump to the end, to the Downloadable materials chapter!
Let’s create a basic Flutter application in the usual way. We can do this from the command line with the “flutter create app-name” command, or from Android Studio.
Then in the index.html file, let’s replace the lines in the
<body>
...
<script src="main.dart.js" type="application/javascript"></script>
</body>
As the next step, let’s specify this for the manifest.json file content. The name and description texts can be given for testing purposes. This will be the name appearing in the browser and the browser extension description.
We can also specify our own icon, but let’s pay attention that it should be in PNG image format, otherwise the browser won’t display it!
{
  "name": "flutter_chrome_extension",
  "description": "flutter_chrome_extension",
  "version": "1.0.0",
  "content_security_policy": {
    "extension_pages": "script-src 'self' ; object-src 'self'"
  },
  "action": {
    "default_popup": "index.html",
    "default_icon": "/icons/Icon-192.png"
  },
  "manifest_version": 3
}
Then there’s nothing left but to make a build of the whole thing by issuing the following command in a terminal window:
flutter build web —web-renderer html —csp
This creates a /build/web directory with all the necessary files in it.
The Chrome browser extension manager can read the contents of this package. Let’s add it!
Note: since I created this extension for testing purposes and didn’t publish it, it needs to be loaded in developer mode. See below!
Chrome -> Settings -> Extensions -> switch to developer mode -> click Load unpacked… button.
Here let’s find the directory, and our new extension will be installed. We can pin this in the browser for quick access:
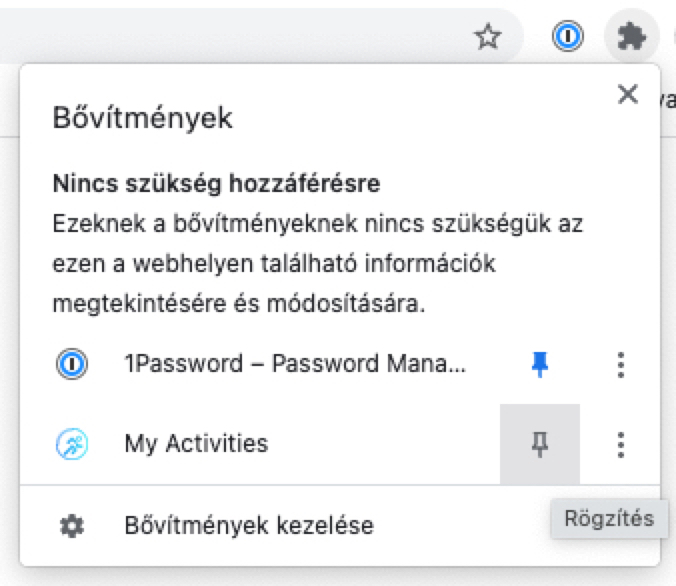 Pinning browser extension
Downloadable materials
GitHub repo: https://github.com/vborbely/my_activities_chrome_extension
I shared the installable Chrome extension (ZIP) and the description.
If you are also thinking about developing a browser extension, contact me with confidence through my contacts to discuss it. If you just want to ask for advice or have a good conversation, I’m open to that too 🙂
My previous articles may also interest you on the topic. Happy exploring!